How to Use IntelliCoach Calendars
A step-by-step guide for managing course schedules.
What is this tool?
This is our course calendar tool. It lets us publish course schedules online so participants can see their session dates, times, and topics. It automatically shows the times in different time zones (for example, Singapore, Adelaide, and Berlin all at once).
You can find it at: courses.web.intellicoach.com
As an admin, you can upload course schedules, edit them, hide or delete them, and get shareable links to send to participants. Participants only see the public schedule page — they don't need to log in.
How to log in
To manage courses, you need to log in to the admin area. Here's how:
- Go to courses.web.intellicoach.com/admin, or click the "Admin" link in the top-right corner of any page.
- You'll see the login screen (shown below). Select your name from the "Who are you?" dropdown.
- Type your PIN number into the box.
- Click the blue "Login" button.

The login screen — select your name, enter your PIN, and click Login.
Once you're logged in, you'll see your name in the top-right corner next to a "Logout" link. You'll stay logged in as you move between pages until you click Logout.
The dashboard
After logging in, you land on the Course Dashboard. This is your home base for managing all courses. Go to it any time at: courses.web.intellicoach.com/admin
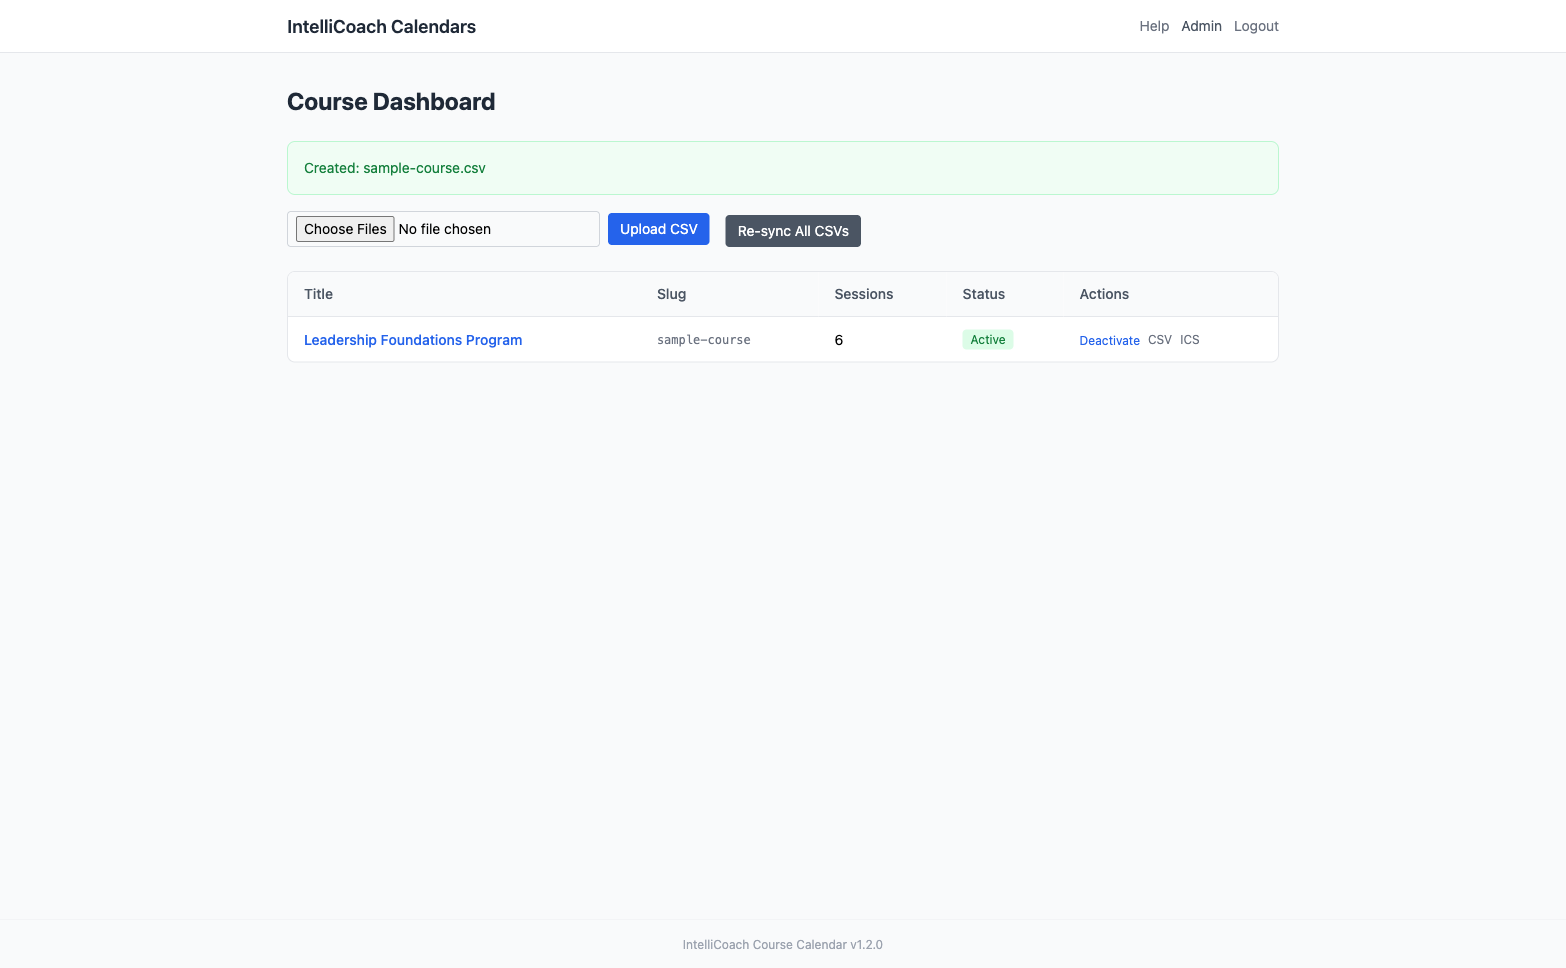
The dashboard with one course. You can see the Upload CSV button, the course table, and quick actions.
On this page you'll see:
- "Choose Files" + "Upload CSV" — this is how you add new courses (more on this below).
- "Re-sync All CSVs" — a grey button that re-reads all uploaded CSV files. You normally don't need this.
- The course table — lists all your courses with their title, slug (the short name used in the URL), number of sessions, status (Active or Inactive), and quick actions.
To open a course and see all its details, just click on the course title (it's a blue link).
Uploading a new course
To add a new course schedule, you upload a CSV file (a simple spreadsheet file). Here's how, step by step:
- Go to the dashboard.
- Click the "Choose Files" button on the left side of the page.
- A file picker will open. Find your .csv file on your computer and select it. You can also select multiple files at once if you want to upload several courses.
- Click the blue "Upload CSV" button next to the file picker.
- You'll see a green message at the top saying "Created: your-file.csv" — that means it worked!
- Your new course will now appear in the table below.
If you upload a CSV file with the same filename as an existing course, it will update that course instead of creating a duplicate. This is how you make changes — edit the CSV and re-upload it.
How CSV files work
A CSV file is a simple text file that you can create in any text editor, Google Sheets, or Excel (save as .csv). Each course is one CSV file. The system accepts two CSV formats: a simple spreadsheet format (easiest for most people) and a detailed format with extra options.
Option A: Simple spreadsheet format (recommended)
This is the easiest format. It's a standard spreadsheet with one row per session. You can create it in Excel, Google Sheets, or LibreOffice and save as CSV.
Required columns: Title, Start Date, End Date, Timezone. Optional: Description (used as the course name), Location.
Title,Description,Location,Start Date,End Date,Timezone
CORE Program - Session 01,CORE Program Aug-Nov,Zoom,2026-08-31 14:00,2026-08-31 16:00,Asia/Singapore
CORE Program - Session 02,CORE Program Aug-Nov,Zoom,2026-09-07 14:00,2026-09-07 16:00,Asia/SingaporeOption B: Detailed format (more control)
This format has two parts, separated by a line with just three dashes: ---. It gives you more control over display settings like multiple time zones and Zoom links.
Part 1: Course information (at the top)
Each line has a setting name, a comma, then the value. Here's what you can set:
| Setting | What it does | Required? |
|---|---|---|
| title | The name of the course (shows up as the heading) | Yes |
| timezone | The main time zone the sessions are scheduled in (e.g. Asia/Singapore). If you leave this out, it defaults to Singapore time. | No |
| display_timezones | Extra time zones to show as columns. See Setting up time zones for how to write this. | No |
| location | Where the course happens (e.g. "Virtual - Zoom" or "Room 3B") | No |
| zoom_link | The Zoom meeting URL. Shows up as a clickable link for participants. | No |
| notes | A short description of the course. Shows under the title on the public page. | No |
Part 2: The session list (after the ---)
After the --- line, you list all the sessions. The first line must be the headers: date,start_time,end_time,topic,notes
Then one line per session. Dates must be in year-month-day format (e.g. 2026-04-07) and times in 24-hour format (e.g. 16:30 for 4:30pm).
Complete example
Here's what a real CSV file looks like. You can copy this as a starting point:
title,Leadership Foundations Program
timezone,Asia/Singapore
display_timezones,Australia/Adelaide:Adelaide|Asia/Singapore:SG|Europe/Berlin:CET
location,Virtual - Zoom
zoom_link,https://zoom.us/j/1234567890
notes,A 6-session program covering key leadership skills
---
date,start_time,end_time,topic,notes
2026-04-07,16:30,17:30,Introduction to Leadership,Welcome and overview
2026-04-14,16:30,17:30,Communication Skills,Active listening and feedback
2026-04-21,16:30,17:30,Team Dynamics,Building high-performing teams
2026-04-28,16:30,17:30,Decision Making,Strategic thinking frameworks
2026-05-05,16:30,17:30,Conflict Resolution,Managing difficult conversations
2026-05-12,16:30,17:30,Leading Change,Driving transformationSetting up time zones
Because our participants are in different countries, we usually want to show session times in multiple time zones. You set this up in the CSV file using the display_timezones line.
The format is: timezone name, then a colon, then the short label you want to show. If you want multiple time zones, separate them with a pipe character (|).
For example, this line:
display_timezones,Australia/Adelaide:Adelaide|Asia/Singapore:SG|Europe/Berlin:CET...creates three time columns on the schedule page, labeled "Adelaide", "SG", and "CET". The tool automatically converts the times for each zone.
Here are some timezone names you might need:
| Location | Timezone name to use | Suggested label |
|---|---|---|
| Singapore | Asia/Singapore | SG |
| Adelaide | Australia/Adelaide | Adelaide |
| Sydney | Australia/Sydney | Sydney |
| Berlin / CET | Europe/Berlin | CET |
| London / GMT | Europe/London | UK |
| New York / EST | America/New_York | EST |
| Los Angeles / PST | America/Los_Angeles | PST |
| Jakarta | Asia/Jakarta | Jakarta |
| Manila | Asia/Manila | Manila |
| Tokyo | Asia/Tokyo | Tokyo |
If you leave display_timezones empty or don't include it, the schedule will just show times in the main timezone (the one set in the timezone line).
Times are shown in a compact style: 4.30pm (not 16:30), 2pm (not 14:00), 7am (not 07:00).
Editing a course
Need to change session dates, add a new session, or update the course title? Here's how:
- Go to the dashboard and find the course in the table.
- Click "CSV" in the Actions column to download the current CSV file for that course.
- Open the downloaded file in a text editor (TextEdit, Notepad, VS Code) or a spreadsheet app.
- Make your changes — update session dates, change the title, add or remove sessions, etc.
- Save the file (keep the .csv extension).
- Back on the dashboard, click "Choose Files", select your updated file, and click "Upload CSV".
- You'll see a green message saying "Updated: your-file.csv". The course is now updated!
The course detail page
When you click on a course title in the dashboard, you'll see the full course detail page. This shows everything about the course and gives you all the tools to manage it.
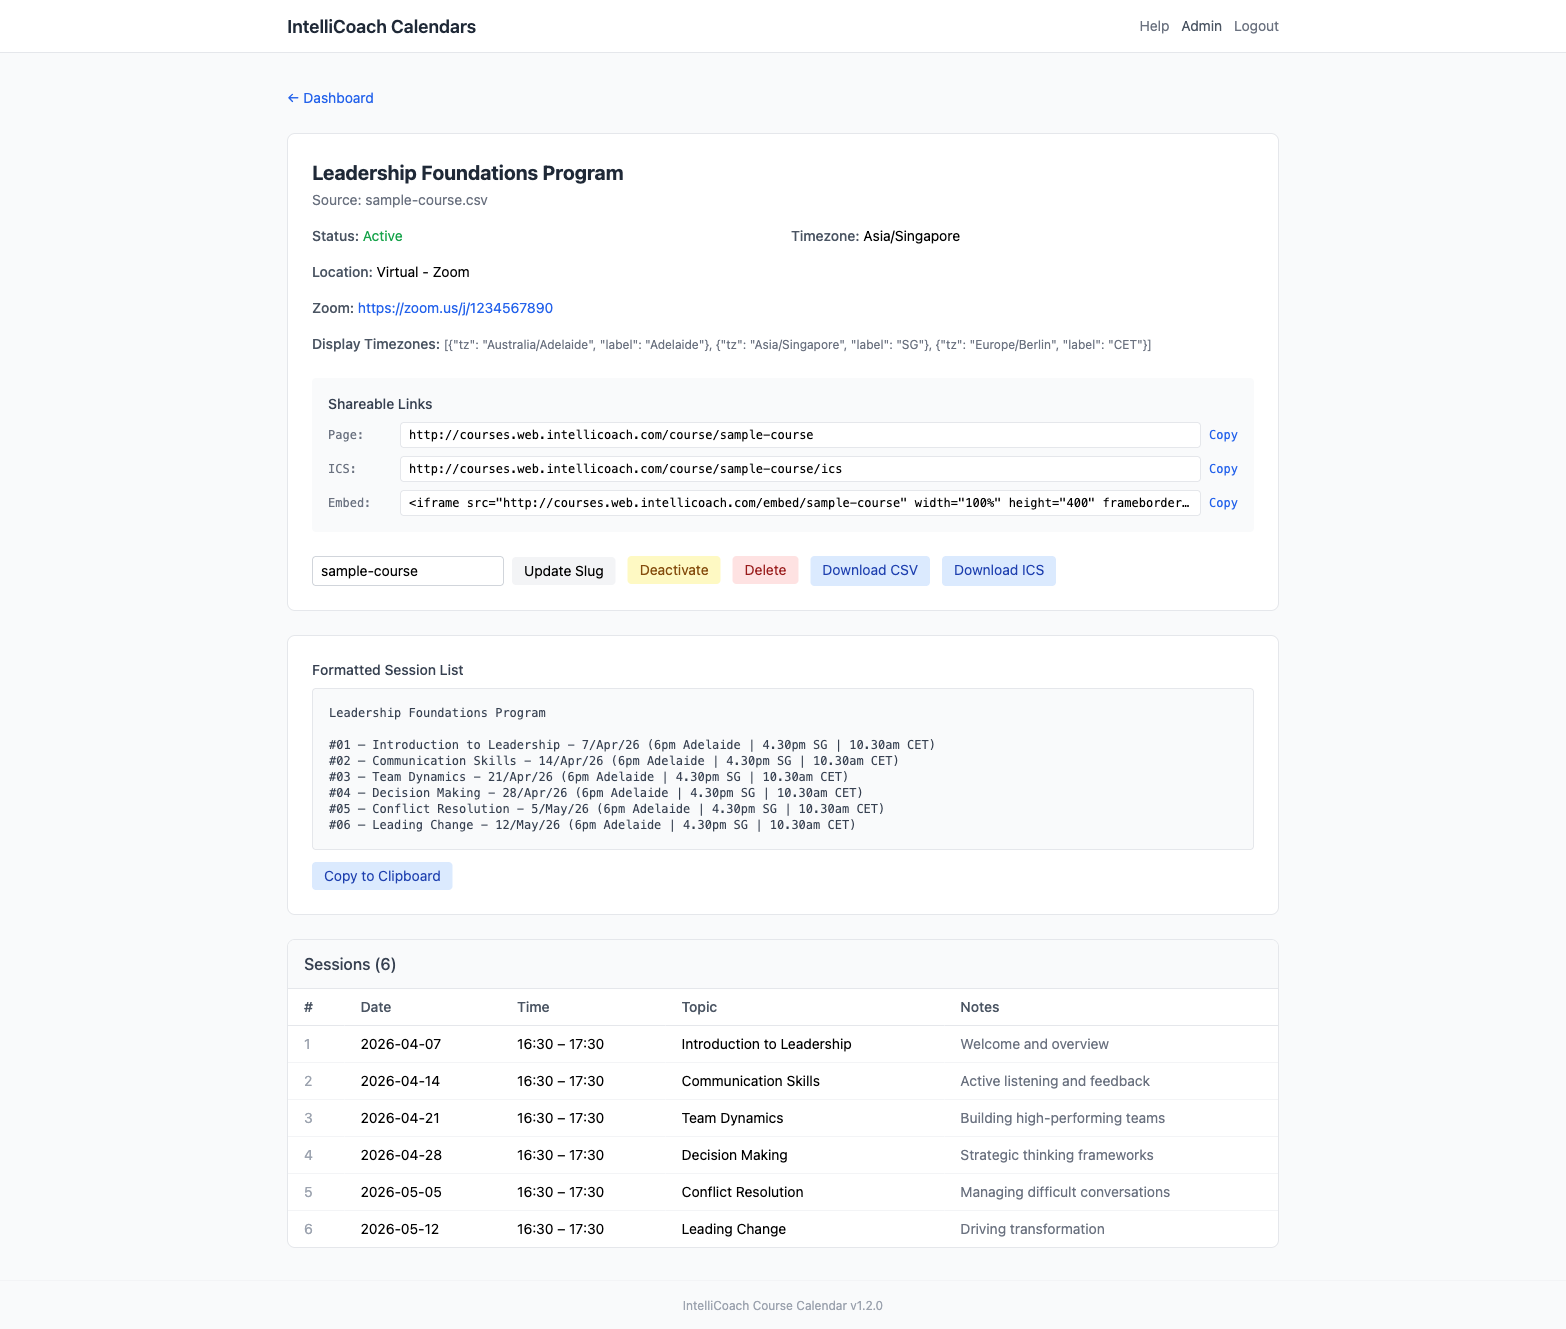
The admin course detail page — your command center for each course.
Here's what you'll find on this page, from top to bottom:
- Course info — the title, status (Active/Inactive), timezone, location, and Zoom link.
- Shareable Links — three links with "Copy" buttons next to each:
- Page — the public URL that participants visit to see the schedule.
- ICS — the calendar subscription link (for adding to Google Calendar, etc.).
- Embed — an HTML snippet for embedding the schedule on another website.
- Action buttons — Update Slug, Deactivate, Delete, Download CSV, Download ICS (more details below).
- Formatted Session List — a nicely formatted text version of all sessions. Click "Copy to Clipboard" to copy it, then paste it into an email or message to participants.
- Sessions table — all sessions listed with their number, date, time, topic, and notes.
What the action buttons do
| Button | What it does |
|---|---|
| Update Slug | Changes the short name in the URL. For example, if the slug is "leadership-2026", the course page will be at /course/leadership-2026. Be careful: changing this breaks any links you've already shared. |
| Deactivate | Hides the course from the public page. The data is still there — you can click "Activate" to bring it back any time. Good for courses that are finished but you want to keep the data. |
| Delete | Permanently deletes the course and all its sessions. You'll get a confirmation dialog, but once confirmed, this cannot be undone. Only use this if you're sure you don't need the course anymore. |
| Download CSV | Downloads the course data as a CSV file. Useful for editing — download, make changes, re-upload. |
| Download ICS | Downloads a calendar file you can import into any calendar app. |
What participants see
When a participant opens the link you shared, they see a clean schedule page. They do not need to log in. Here's what it looks like:
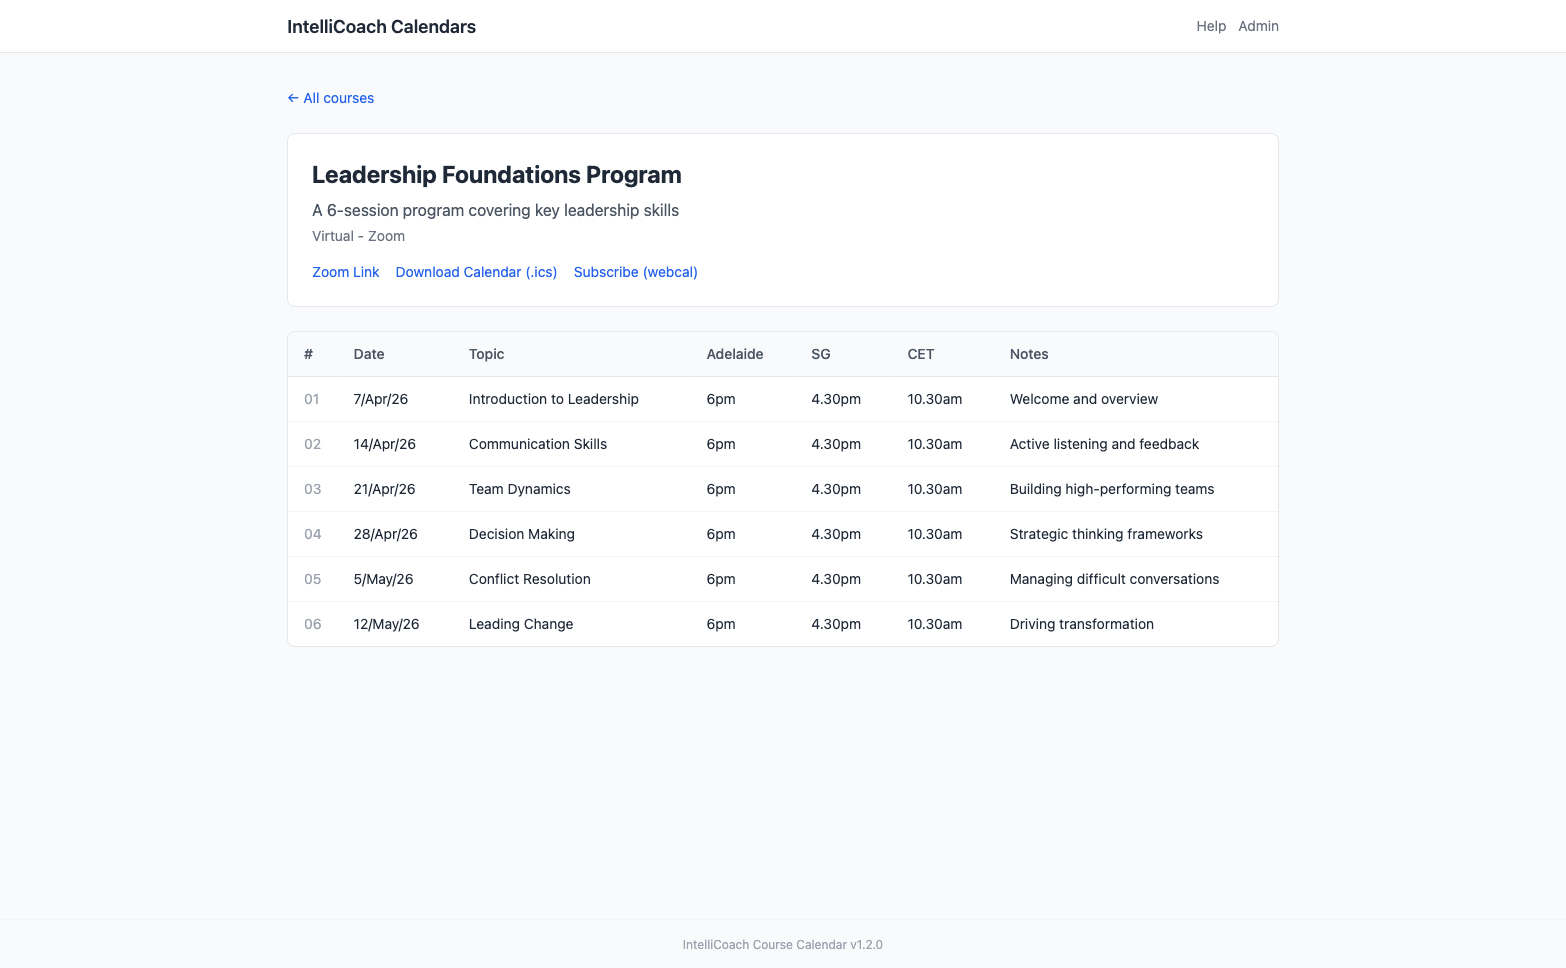
What participants see — a clean schedule with times automatically shown in multiple time zones.
The page shows:
- The course title and description at the top.
- The location and a clickable Zoom link (if you set one up in the CSV).
- Links to download or subscribe to the calendar (so participants can add sessions to their own calendar app).
- A table of all sessions with the date, topic, times in each configured time zone, and notes.
- Sessions that have already passed are shown in lighter gray so it's easy to see what's coming up next.
Calendar subscriptions
Participants can add course sessions to their own calendar app (Google Calendar, Apple Calendar, Outlook, etc.). There are two options on the public course page:
Option 1: Download Calendar (.ics)
This downloads a file that the participant can import into their calendar app. It's a one-time import — if you change the schedule later, the participant's calendar won't update automatically. Best for schedules that won't change.
Option 2: Subscribe (webcal)
This creates a live subscription. The participant's calendar app will check for updates periodically (usually every few hours). If you add or change sessions, the participant's calendar will update automatically. This is the better option for ongoing courses.
Last updated — v1.2.1
Questions? Ask Maik or check the admin dashboard.